[メモ] 迷惑メール対策 SPFの書き方など

同サイトのページだが探しにくいのでメモ。 SPF(Sender Policy Framework) : 迷惑メール対策委員会 SPFの歴史的背景や、SPF設定時のプロパティの解説や記述例。 間違いから学ぶSPFレコードの正しい書き方 : 迷惑メール対策委員会 SPFレコードを設定する際に間違いやすい例を参考に解説。
perl、 MySQL、オープンソース系、ウェブ系ネタ。なぜか鯖管メモがほとんどを占めている…
同サイトのページだが探しにくいのでメモ。 SPF(Sender Policy Framework) : 迷惑メール対策委員会 SPFの歴史的背景や、SPF設定時のプロパティの解説や記述例。 間違いから学ぶSPFレコードの正しい書き方 : 迷惑メール対策委員会 SPFレコードを設定する際に間違いやすい例を参考に解説。
SpamAssasinのみをインストールしたくなったのでメールサーバ再構築のついでに試してみる。メールサーバ構築のまとめ でPostfix+MySQL+postfixadminは構築済みとして想定しています。そちらではウィルスチェックも導入しているため今回はスパムチェックのみの導入。 また、学習機能があるようなので試してみる。スパム判定の精度が高まるみたい。 .Spam ディレクトリの作成 スパムメールの学習 通常のメールの学習 コレに合わせて postfixadmin +procmailな環境でメールディレクトリの自動作成・削除 のメールディレクトリ作成スクリプトに .Spam を作るコマン […]
スマートフォンでpush通知出来るようにIMAP-IDLE対応のdovecot2をインストールする。 基本的には メールサーバ構築のまとめ(複数のバーチャルドメイン+Postfix+MySQL+Dovecot+procmail+Clam AntiVirus+spamassassin+postfixadmin) のdovecotの部分をdovecot2にするための記事。 ATrpmsリポジトリを追加 yumでインストールできるようにするため、ATrpmsリポジトリを追加する。 # vi /etc/yum.repos.d/atrpms.repo [atrpms] name=Redhat Enter […]
サーバー証明書を作成 メールサーバー間通信内容暗号化(OpenSSL+Postfix+Dovecot) - CentOSで自宅サーバー構築 を参考にサーバー証明書を作成 # cd /etc/pki/tls/certs/ # make mail.pem umask 77 ; \ PEM1=`/bin/mktemp /tmp/openssl.XXXXXX` ; \ PEM2=`/bin/mktemp /tmp/openssl.XXXXXX` ; \ /usr/bin/openssl req -utf8 -newkey rsa:2048 -keyout $PEM1 -nodes -x509 -day […]
とりあえずwebアプリ制作において開発環境からメール送信できればいいのでそれなりの設定です。 本格的なメールサーバーとしては運用できませんのであしからず。 OP25Bとは 主要プロバイダを使っている場合はほぼ対策しなくてはメールが送れません。なぜならプロバイダが25番ポートでの接続を遮断してしまうからです。25番ポートを使った通信が出来ません。 対策としては契約しているプロバイダ経由でメールを送ります。 OP25Bの確認 OP25B(Outbound Port 25 Blocking)対策 - CentOSで自宅サーバー構築 $ telnet smtp.gmail.com 25 Trying […]
こんなエントリ(ネットショップ運営者必見?迷惑メール扱いを回避する手順 :: drk7jp )があるので、とりあえずDKIMを導入してみる。 DKIMを導入するに以前は dkim-milter を使うのが一般的だったようだけど、最近では OpenDKIM を使うようだ。 参考: CentOS6.2でOpenDKIM(DomainKeys Identified Mail)のインストール、設定 | 実験酒場 Postfix + dkim-milterからOpenDKIMに移行する » blog::dameningen 準備 OpenDKIMのインストール ※rpmforgeまたはepelリポジトリ […]
[Postfix] 自宅メールサーバが迷惑メールサーバと思われているので、プロバイダ経由でメール配信する設定 でプロバイダ経由で送信するのはいいけど、メーリングリストのように一度に大量の相手にメールを送るときにサーバビジーとなり、メールキューが貯まる。 Mar 2 07:12:45 mail postfix/smtp[2760]: 23AAD323853: to=xxxxxxxx@xxxxx.co.jp, relay=smtp.hoge.com[xxx.xxx.xxx.xx]:587, delay=4343, delays=4281/31/0.12/30, dsn=4.0.0, status= […]
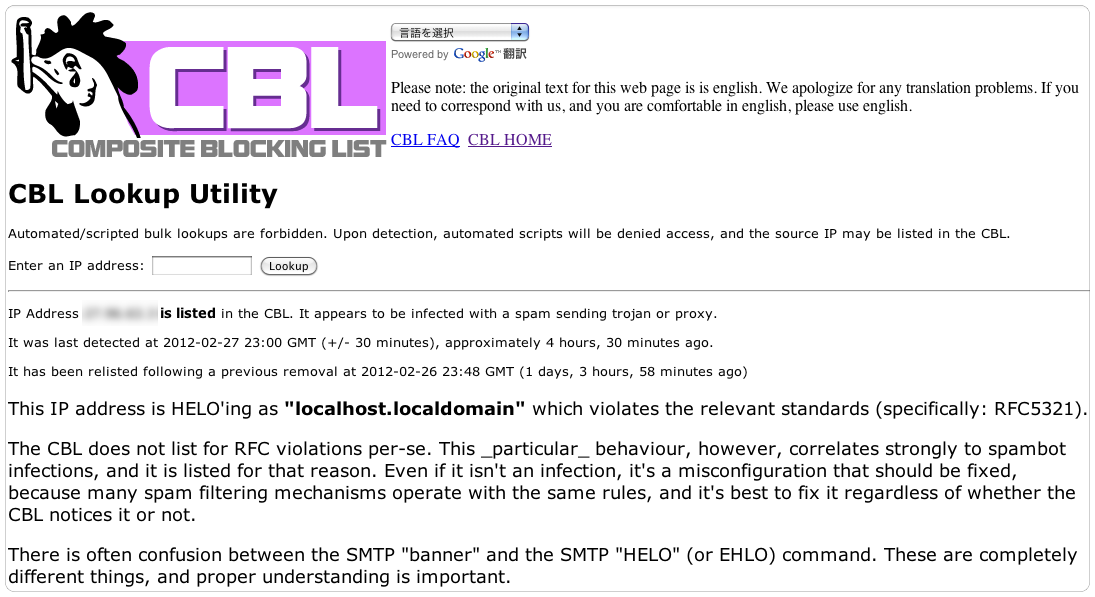
The Spamhaus Project 解除申請も出来なくなってしまいました。 以前はリンクをクリックして解除できたのですが、、、。 telnetでsmtpしてもHELOでドメイン名返しているし、helocheck@cbl.abuseat.orgにメールを送ることで出来るチェックも異常ない感じ。 それでもHELOで”localhost.localdomain”返すなや!って怒られてる。 どうもIPアドレスブロックごとごっそり登録する傾向があるようなので、他の迷惑なユーザーのせいじゃないかと疑っているけれど、そんな事よりもメールが送れない方が深刻な問題。 結局プロバイダのメールサーバにリレー […]
DNSの逆引き設定 今まで逆引き設定していなかったメールサーバから送ったメールには Received: from sv.domain.com (sv.domain.com [127.0.0.1]) by mail.domain.com (Postfix) with SMTP id… のようなヘッダとなっていて、localhost(127.0.0.1)から送られたものだとされていた。 これが迷惑メールとされる一因なので、mail.domain.com はちゃんとしたサーバですよー、と知らせるためにグローバルなIPアドレスをあててあげる。 DNSの逆引きはドメインの管理とは関係ないので、回線業者が […]
2013/02/23追記 dovecot2にアップグレードしたエントリーはこちら 2013/02/22追記 TLS対応。エントリーはこちら 2013/01/15追記 wpの設定を変えたこともあり見難いので随時記事を添削します。 2013/01/13追記 PostfixのMySQL対応はyumで出来るようです。詳しくは該当箇所で 2012/08/31追記 master.cf の設定に漏れがありました。詳しくは該当箇所で 2012/09/05追記 main.cf の設定に追加しました。詳しくは該当箇所で 設定項目などはほぼコピペ。自分用のメモ。 記事中の各リンク先の通り設定したのではなかなか実現で […]