メールサーバ構築のまとめ(複数のバーチャルドメイン+Postfix+MySQL+Dovecot+procmail+Clam AntiVirus+spamassassin+postfixadmin)

設定項目などはほぼコピペ。自分用のメモ。
記事中の各リンク先の通り設定したのではなかなか実現できないので多少アレンジしています。
ローカルのUNIXユーザーはMairdir/方式でメールを使いたい。
バーチャルドメイン複数の運用、かつ、Web GUIでメールアカウントを管理したい。
スパムメールとウィルスもチェックしたい。
このような要望のもと、メールサーバを立て直した際に以前書いた記事をまとめてみた。
さすがに長文になったので続きを読むにした。
- CentOS5.5 i386とする
- MySQLは設定済み前提
- ローカルのUNIXユーザはMaildir方式でメールを利用する。
メールボックスは ~/home/username/Mairdir - 複数のドメインをバーチャルドメインで扱う。
メールボックスは /mail/domain.tld/user@domain.tld - PostfixをMTAとしてバーチャルドメインでのメールアカウントはMySQLで管理する。
- Clam AntiVirusでウィルスチェックを行う。
- SpamAssassinでスパムチェックを行う。このため各メールボックスへの配送(transport)はprocmailで行う。
※スガラボット (守田 直哉)さんのコメントを参考にすると、メールボックスは /mail/domain.tld/user@domain.tld/Mairdir にしておいた方がdovecot2を使う時に良さそうです。
MySQL対応版Postfixのインストール
CentOSの場合はCentOS Plusリポジトリを追加(有効に)することでyumでインストール出来る。
centosplusリポジトリの有効化
# vi /etc/yum.repos.d/CentOS-Base.repo

[centosplus]
name=CentOS-$releasever - Plus
mirrorlist=http://mirrorlist.centos.org/?release=$releasever&arch=$basearch&repo=centosplus
#baseurl=http://mirror.centos.org/centos/$releasever/centosplus/$basearch/
gpgcheck=1
enabled=1 ←0から1に修正して有効にする
gpgkey=file:///etc/pki/rpm-gpg/RPM-GPG-KEY-CentOS-5
Postfixのupdate
# yum update postfix

...


===================================================================
 Package           Arch   Version               Repository    Size
===================================================================
Updating:
 postfix           i386   2:2.3.3-2.3.0.1.el5.centos.mysql_pgsql
                                                centosplus   3.7 M

...
mysql対応になっているかの確認
mysqlと出れば対応している。
# postconf -m|grep mysql
mysql
※MySQLとPostgreSQLがインストールされていない場合は関連するものがインストールされます。
PostfixAdmin
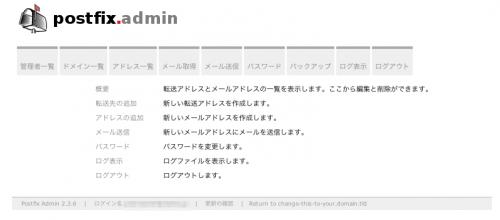
バーチャルドメインでのメールアカウントの管理はブラウザGUIから管理できるPostfixAdminを利用する。
postfixadminのインストール
最新版をチェック
http://sourceforge.net/projects/postfixadmin/
# wget http://nchc.dl.sourceforge.net/sourceforge/postfixadmin/postfixadmin-2.3.2.tar.gz
# tar zxvf postfixadmin-2.3.2.tar.gz
# mv postfixadmin-2.3.2/ /var/www/postfixadmin
postfixadminの設定
# cd /var/www/postfixadmin
# cp config.inc.php config.inc.php.copy
# vi config.inc.php

/*****************************************************************
 *  !!!!!!!!!!!!!!!!!!!!!!!!!!!!!!!!!!!!!!!!!!!!!!!!!!!!!!!!!!!!
 * You have to set $CONF['configured'] = true; before the
 * application will run!
 * Doing this implies you have changed this file as required.
 * i.e. configuring database etc; specifying setup.php password etc.
 */
//$CONF['configured'] = false;
$CONF['configured'] = true;       ←修正

// In order to setup Postfixadmin, you MUST specify a hashed password here.
// To create the hash, visit setup.php in a browser and type a password into the
 field,
// on submission it will be echoed out to you as a hashed value.
//$CONF['setup_password'] = 'changeme';
$CONF['setup_password'] = 'xxxxxxxx';  ←修正 セットアップ用のパスワードを設定

// Postfix Admin Path
// Set the location of your Postfix Admin installation here.
// YOU MUST ENTER THE COMPLETE URL e.g. http://domain.tld/postfixadmin
$CONF['postfix_admin_url'] = '';

// shouldn't need changing.
$CONF['postfix_admin_path'] = dirname(__FILE__);

// Language config
// Language files are located in './languages', change as required..
//$CONF['default_language'] = 'en';
$CONF['default_language'] = 'ja';       ←修正
// Database Config
// mysql = MySQL 3.23 and 4.0, 4.1 or 5
// mysqli = MySQL 4.1+
// pgsql = PostgreSQL
↓適時修正
$CONF['database_type'] = 'mysql';
$CONF['database_host'] = 'localhost';
$CONF['database_user'] = 'postfix';
$CONF['database_password'] = 'pass';
$CONF['database_name'] = 'postfix';
$CONF['database_prefix'] = '';

// Site Admin
// Define the Site Admins email address below.
// This will be used to send emails from to create mailboxes.
//$CONF['admin_email'] = 'postmaster@change-this-to-your.domain.tld';
$CONF['admin_email'] = 'postmaster@hoge.jp';       ←修正

// Encrypt
// In what way do you want the passwords to be crypted?
// md5crypt = internal postfix admin md5
// md5 = md5 sum of the password
// system = whatever you have set as your PHP system default
// cleartext = clear text passwords (ouch!)
// mysql_encrypt = useful for PAM integration
// authlib = support for courier-authlib style passwords
// dovecot:CRYPT-METHOD = use dovecotpw -s 'CRYPT-METHOD'. Example: dovecot:CRAM-MD5
//$CONF['encrypt'] = 'md5crypt';
$CONF['encrypt'] = 'cleartext';       ←修正

// Page Size
// Set the number of entries that you would like to see
// in one page.
//$CONF['page_size'] = '10';
$CONF['page_size'] = '100';       ←修正

// Mailboxes
// If you want to store the mailboxes per domain set this to 'YES'.
// Examples:
//   YES: /usr/local/virtual/domain.tld/username@domain.tld
//   NO:  /usr/local/virtual/username@domain.tld
$CONF['domain_path'] = 'YES';       ←修正

// Default Domain Values
// Specify your default values below. Quota in MB.
//$CONF['aliases'] = '10';
//$CONF['mailboxes'] = '10';
//$CONF['maxquota'] = '10';
$CONF['aliases'] = '100';       ←修正
$CONF['mailboxes'] = '100';
$CONF['maxquota'] = '300';

// Quota
// When you want to enforce quota for your mailbox users set this to 'YES'.
$CONF['quota'] = 'YES';       ←修正

// Backup
// If you don't want backup tab set this to 'NO';
$CONF['backup'] = 'YES';

// Send Mail
// If you don't want sendmail tab set this to 'NO';
$CONF['sendmail'] = 'YES';

// Fetchmail
// If you don't want fetchmail tab set this to 'NO';
$CONF['fetchmail'] = 'YES';
apacheの設定
webブラウザでアクセスできるようにする。必要に応じてIP制限、Basic認証などを行う。個人的にはSSL接続推奨。
postfixadmin用コンフィグを新規作成 # vi /etc/httpd/conf.d/postfixadmin.conf Alias /postfixadmin "/var/www/postfixadmin"Order allow,deny Allow from all
postfixadminのセットアップスクリプト実行
http://hogehoge/postfixadmin/setup.php
へアクセスする。
設定が正しければページの最後にフォームが出る。
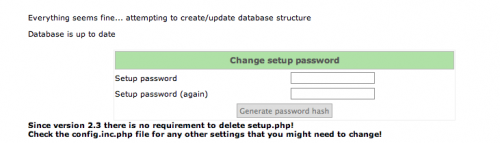
このフォームに config.inc.php の$CONF['setup_password'] ="xxxxxxxx"; にある値を入力するとハッシュキーが作成される。
config.inc.php の$CONF['setup_password'] ="xxxxxxxx"; の値を作成されたハッシュキーに変更する。
If you want to use the password you entered as setup password, edit config.inc.php and set
$CONF['setup_password'] = 'xxxxxd9ae95306513xxxxxxxxx:71d063841 xxxx38xxxxxdxx06bcexxxx';
// In order to setup Postfixadmin, you MUST specify a hashed password here.
// To create the hash, visit setup.php in a browser and type a password into the field,
// on submission it will be echoed out to you as a hashed value.
$CONF['setup_password'] = 'xxxxxd9ae95306513xxxxxxxxx:71d063841xxxx38xxxxxdxx06bcexxxx';    ←ここを修正
postfixadmin管理ユーザーの追加
設定したセットアップパスワード(ハッシュキーではない)を使って管理ユーザーを設定する。
ログインを確認できたらセットアップスクリプトを削除する
# rm -f /var/www/postfixadmin/setup.php
# rm -f /var/www/postfixadmin/motd*
MySQLを使うためのPostfixの設定
メール保存用ルートディレクトリ
/mail をメール専用アカウントの保存用ルートディレクトリとする。
各ユーザーのメールボックスは /mail/domain.jp/user@domain.jp とする。
##バーチャルドメインで処理するユーザーの作成
# groupadd -g 10000 vuser
# useradd -g vuser -u 10000 vuser

##メール保存用ルートディレクトリの作成
# mkdir /mail
# chown vuser:vuser /mail
# chmod 771 /mail
postfix用の設定ファイル作成
MySQLのユーザーとパスワードを適時変更すること
(サンプルは ユーザー=postfix パスワード=pass)
/etc/postfix/mysql_virtual_alias_maps.cf
/etc/postfix/mysql_virtual_domains_maps.cf
/etc/postfix/mysql_virtual_mailbox_maps.cf
/etc/postfix/mysql_virtual_mailbox_limit_maps.cf
# vi /etc/postfix/mysql_virtual_alias_maps.cf
user = postfix
password = pass
hosts = localhost
dbname = postfix
table = alias
select_field = goto
where_field = address

# vi /etc/postfix/mysql_virtual_domains_maps.cf
user = postfix
password = pass
hosts = localhost
dbname = postfix
table = domain
select_field = domain
where_field = domain
additional_conditions = and active = '1'

# vi /etc/postfix/mysql_virtual_mailbox_maps.cf
user = postfix
password = pass
hosts = localhost
dbname = postfix
table = mailbox
select_field = maildir
where_field = username

# vi /etc/postfix/mysql_virtual_mailbox_limit_maps.cf
user = postfix
password = pass
hosts = localhost
dbname = postfix
table = mailbox
select_field = quota
where_field = username
#additional_conditions = and active = '1'
生のパスワードが記述されているのでグループをpostfixにしてパーミッションを変更しておく。
# chown :postfix /etc/postfix/mysql_virtual_*
# chmod 640 /etc/postfix/mysql_virtual_*
Postfix設定ファイル main.cf の編集
元のファイルをコピーしてから編集する。
# cp /etc/postfix/main.cf /etc/postfix/main.cf.org
# vi /etc/postfix/main.cf

# INTERNET HOST AND DOMAIN NAMES
#
# The myhostname parameter specifies the internet hostname of this
# mail system. The default is to use the fully-qualified domain name
# from gethostname(). $myhostname is used as a default value for many
# other configuration parameters.
#
#myhostname = host.domain.tld
#myhostname = virtual.domain.tld
myhostname = mail.example.com    ←追加(自FQDN名を指定)

# The mydomain parameter specifies the local internet domain name.
# The default is to use $myhostname minus the first component.
# $mydomain is used as a default value for many other configuration
# parameters.
#
#mydomain = domain.tld
mydomain = example.com ← 追加(自ドメイン名を指定)

# SENDING MAIL
#
# The myorigin parameter specifies the domain that locally-posted
# mail appears to come from. The default is to append $myhostname,
# which is fine for small sites.  If you run a domain with multiple
# machines, you should (1) change this to $mydomain and (2) set up
# a domain-wide alias database that aliases each user to
# user@that.users.mailhost.
#
# For the sake of consistency between sender and recipient addresses,
# myorigin also specifies the default domain name that is appended
# to recipient addresses that have no @domain part.
#
#myorigin = $myhostname
#myorigin = $mydomain
myorigin = $myhostname    ← 追加(ローカルからのメール送信時の送信元メールアドレス@以降にドメイン名を付加)

#inet_interfaces = all
#inet_interfaces = $myhostname
#inet_interfaces = $myhostname, localhost
#inet_interfaces = localhost
inet_interfaces = all    ←変更(外部からのメール受信を許可)

#mydestination = $myhostname, localhost.$mydomain, localhost
#mydestination = $myhostname, localhost.$mydomain, localhost, $mydomain
#mydestination = $myhostname, localhost.$mydomain, localhost, $mydomain,
#       mail.$mydomain, www.$mydomain, ftp.$mydomain
mydestination = $myhostname, localhost.$mydomain, localhost     ←修正

# NOTE: Postfix will not automatically forward mail for domains that
# list this system as their primary or backup MX host. See the
# permit_mx_backup restriction description in postconf(5).
#
#relay_domains = $mydestination
relay_domains = $mydestination     ←コメント削除

# DELIVERY TO MAILBOX
#
# The home_mailbox parameter specifies the optional pathname of a
# mailbox file relative to a user's home directory. The default
# mailbox file is /var/spool/mail/user or /var/mail/user.  Specify
# "Maildir/" for qmail-style delivery (the / is required).
#
#home_mailbox = Mailbox
#home_mailbox = Maildir/
home_mailbox = Maildir/ ← 追加(メールボックス形式をMaildir形式にする)

# SHOW SOFTWARE VERSION OR NOT
#
# The smtpd_banner parameter specifies the text that follows the 220
# code in the SMTP server's greeting banner. Some people like to see
# the mail version advertised. By default, Postfix shows no version.
#
# You MUST specify $myhostname at the start of the text. That is an
# RFC requirement. Postfix itself does not care.
#
#smtpd_banner = $myhostname ESMTP $mail_name
#smtpd_banner = $myhostname ESMTP $mail_name ($mail_version)
smtpd_banner = $myhostname ESMTP unknown ← 追加(メールサーバーソフト名の隠蔽化)

----- 以下を最終行に追記
local_transport = local
virtual_transport = virtual
virtual_mailbox_base = /mail
virtual_alias_maps = mysql:/etc/postfix/mysql_virtual_alias_maps.cf
virtual_alias_domains = $virtual_alias_maps
virtual_mailbox_domains = mysql:/etc/postfix/mysql_virtual_domains_maps.cf
virtual_mailbox_maps = mysql:/etc/postfix/mysql_virtual_mailbox_maps.cf
virtual_minimum_uid = 10000
virtual_uid_maps = static:10000
virtual_gid_maps = static:10000

maximal_backoff_time = 800s
minimal_backoff_time = 100s
bounce_queue_lifetime = 60m
maximal_queue_lifetime = 60m

#mailbox_size_limit = 1024000000
message_size_limit = 20480000

#virtual_mailbox_limit = 51200000
virtual_mailbox_limit_maps = mysql:/etc/postfix/mysql_virtual_mailbox_limit_maps.cf
virtual_mailbox_limit_override = yes
virtual_overquota_bounce = yes
virtual_mailbox_limit_inbox = yes

smtpd_sasl_auth_enable = yes
smtpd_sasl_security_options = noanonymous
smtpd_sasl_type = dovecot
smtpd_sasl_path = private/auth
smtpd_sasl_local_domain = $myhostname
smtpd_recipient_restrictions = permit_mynetworks,  permit_sasl_authenticated, permit_auth_destination, reject_unauth_destination, reject
smtpd_sasl_security_options = noanonymous を追記。
エンタープライズ:セキュリティ How-To 第6回:メールサーバの不正利用対策(SMTP Authenticationの導入-Postfix編) を参考にさせて頂きました。匿名での接続を拒否する設定にしておく。
smtpd_recipient_restrictions に関しては 不正中継の可否をチェックする を参考にさせて頂きました。
最後に reject を追加すると外部からメールが受け取れないのですが、 permit_auth_destination を設定することで mydomain で指定したドメイン名で受信可能になるようです。
ローカルユーザーのメールが配信されない(root宛のメールなど)対策として、
mydestination = $myhostname, localhost.$mydomain, localhost ※ローカル配送の最終到達ドメイン。

relay_domains = $mydestination

local_transport = local
としている。
他の対処法としては/etc/aliases に転送先を設定する方法などもある。
また、LAN(192.168.0.0/16)内の他サーバからのリレーのみ許可するので以下の設定も追加する。
# Specify "mynetworks_style = host" when Postfix should "trust"
# only the local machine.
#
#mynetworks_style = class
mynetworks_style = subnet ←追加
#mynetworks_style = host

# Alternatively, you can specify the mynetworks list by hand, in
# which case Postfix ignores the mynetworks_style setting.
#
# Specify an explicit list of network/netmask patterns, where the
# mask specifies the number of bits in the network part of a host
# address.
#
# You can also specify the absolute pathname of a pattern file instead
# of listing the patterns here. Specify type:table for table-based lookups
# (the value on the table right-hand side is not used).
#
#mynetworks = 168.100.189.0/28, 127.0.0.0/8
#mynetworks = $config_directory/mynetworks
#mynetworks = hash:/etc/postfix/network_table
mynetworks = 192.168.0.0/16, 127.0.0.0/8 ←追加
新規ローカルユーザー対策
新規ユーザーが追加されたらホームディレクトリに Mairdir/ を自動で作成されるようにする。
# mkdir -p /etc/skel/Maildir/{new,cur,tmp}
# chmod -R 700 /etc/skel/Maildir/
既に運用中で既存ユーザーの対策をする場合はメールサーバー構築(Postfix+Dovecot) - CentOSで自宅サーバー構築の「(3)Maildir形式メールボックス作成 メールデータ移行」を参考に対処する。
サブミッションポート(587番ポート)を利用する
master.cfのsubmissionの行のコメントを外すだけ。
2012/08/31修正
master.cfのsubmission関連の行のコメントを外すだけ。
-o smtpd_enforce_tls=yes のコメントを外す場合はTLSを有効にしている必要がある。
# vi /etc/postfix/master.cf
# ==========================================================================
# service type  private unpriv  chroot  wakeup  maxproc command + args
#               (yes)   (yes)   (yes)   (never) (100)
# ==========================================================================
smtp      inet  n       -       n       -       -       smtpd

# ---> コメント削除
submission inet n       -       n       -       -       smtpd
#  -o smtpd_enforce_tls=yes  ← TLSの設定をしていないとエラーになるのでとりあえずコメントのままにしておく
  -o smtpd_sasl_auth_enable=yes
  -o smtpd_client_restrictions=permit_sasl_authenticated,reject
# <--- コメント削除
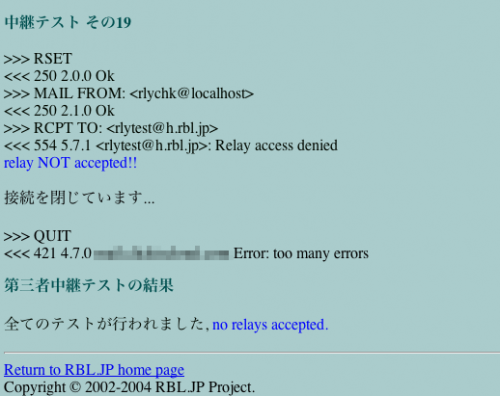
メールサーバの不正中継のテスト
第三者による不正中継がされないか以下のページにてチェックする。
第三者中継チェック RBL.JP
青い文字で no relays accepted. と出ればOK。
Dovecotの設定
Dovecotのインストール
※dovecot1.xの設定です。dovecot2に移行したエントリ
# yum install dovecot
Dovecotの設定
# cp /etc/dovecot.conf /etc/dovecot.conf.org
# vi /etc/dovecot.conf

# Protocols we want to be serving: imap imaps pop3 pop3s
# If you only want to use dovecot-auth, you can set this to "none".
#protocols = imap imaps pop3 pop3s
protocols = imap imaps pop3 pop3s    ←コメント削除

....

#   mail_location = maildir:~/Maildir
#   mail_location = mbox:~/mail:INBOX=/var/mail/%u
#   mail_location = mbox:/var/mail/%d/%1n/%n:INDEX=/var/indexes/%d/%1n/%n
#
#
#
#mail_location =
mail_location = maildir:/mail/%d/%u   ←追記

....


# Valid UID range for users, defaults to 500 and above. This is mostly
# to make sure that users can't log in as daemons or other system users.
# Note that denying root logins is hardcoded to dovecot binary and can't
# be done even if first_valid_uid is set to 0.
#first_valid_uid = 500
first_valid_uid = 10000   ←追記

# Valid GID range for users, defaults to non-root/wheel. Users having
# non-valid GID as primary group ID aren't allowed to log in. If user
# belongs to supplementary groups with non-valid GIDs, those groups are
# not set.
#first_valid_gid = 1
first_valid_gid = 10000   ←追記


....


  # SQL database
  passdb sql {    ←コメント削除
    # Path for SQL configuration file, see doc/dovecot-sql-example.conf
    #args =
    args = /etc/dovecot-mysql.conf    ←追記
  }    ←コメント削除


....


  # SQL database
  userdb sql {    ←コメント削除
    # Path for SQL configuration file, see doc/dovecot-sql-example.conf
    #args =
   args = /etc/dovecot-mysql.conf    ←追記
  }    ←コメント削除

....


auth default {
  # Space separated list of wanted authentication mechanisms:
  #   plain login digest-md5 cram-md5 ntlm rpa apop anonymous gssapi
  # NOTE: See also disable_plaintext_auth setting.
  #mechanisms = plain  ←コメントアウト
  mechanisms = plain login digest-md5 cram-md5    ←追記


....


##
## POP3 specific settings
##

protocol pop3 {
  # Login executable location.
  #login_executable = /usr/libexec/dovecot/pop3-login
  〜略〜
  #pop3_uidl_format = %08Xu%08Xv
  pop3_uidl_format = %08Xu%08Xv    ←コメント削除
}


....


  # It's possible to export the authentication interface to other programs:
  socket listen {    ←コメント削除
    #master {
      # Master socket provides access to userdb information. It's typically
      # used to give Dovecot's local delivery agent access to userdb so it
      # can find mailbox locations.
      #path = /var/run/dovecot/auth-master
      #mode = 0600
      # Default user/group is the one who started dovecot-auth (root)
      #user =
      #group =
    #}
    client {    ←コメント削除
      # The client socket is generally safe to export to everyone. Typical use
      # is to export it to your SMTP server so it can do SMTP AUTH lookups
      # using it.
      #path = /var/run/dovecot/auth-client
      #mode = 0660
      path = /var/spool/postfix/private/auth    ←追記
      mode = 0660    ←追記
      user = postfix    ←追記
      group = postfix    ←追記
    }    ←コメント削除
  }    ←コメント削除


....


##x86_64環境の場合は以下をコメント削除する。i386の場合は大丈夫。
# Set max. process size in megabytes. If you don't use
# login_process_per_connection you might need to grow this.
login_process_size = 64    ←コメント削除
/etc/dovecot-mysql.conf を新規作成
connect項目のhostやuser、passwordは適時変更すること。
※ host=/var/lib/mysql/mysql.sock などソケットでも可。
# vi /etc/dovecot-mysql.conf

driver = mysql
default_pass_scheme = PLAIN
connect = dbname=postfix host=localhost user=postfix password=passwd
password_query = SELECT password FROM mailbox WHERE username = '%u' AND active = '1'
user_query = SELECT concat('/mail/', maildir) as home, 10000 as uid, 10000 as gid FROM mailbox WHERE username = '%u' AND active = '1'
パーミッションを変更しておく
# chmod 600 /etc/dovecot-mysql.conf
認証用ライブラリをインストール
# yum install cyrus-sasl-plain cyrus-sasl-md5
saslauthdは利用しないので念のため停止しておく。
# /etc/rc.d/init.d/saslauthd stop
# chkconfig saslauthd off
PostfixとDovecotを起動する
/var/log/maillogにエラーなどがでていないか確認。
なお、sendmail等他のMTAで運営していた場合は切り替えが必要。
#sendmailから切り替える場合
# /etc/rc.d/init.d/sendmail stop  ←sendmail停止
sm-client を停止中:                                        [  OK  ]
sendmail を停止中:                                         [  OK  ]

# chkconfig sendmail off  ←sendmail自動起動off
# chkconfig --list sendmail  ←自動起動off確認
sendmail       	0:off	1:off	2:off	3:off	4:off	5:off	6:off

# alternatives --config mta  ←MTA切り替え
2 プログラムがあり 'mta'を提供します。

  選択       コマンド
-----------------------------------------------
*+ 1           /usr/sbin/sendmail.sendmail
   2           /usr/sbin/sendmail.postfix

Enterを押して現在の選択[+]を保持するか、選択番号を入力します:2 ←2を選択
# /etc/init.d/dovecot start    ←dovecot起動
chkconfig dovecot on    ←自動起動設定
# /etc/init.d/postfix start    ←postfix起動
chkconfig postfix on    ←自動起動設定
ルーターの設定
ファイアウォールなどのフィルタがある場合、25番,110番(popの場合),143番(IMAPの場合),587番ポートを通すように設定する。
クライアントのメーラーの設定
クライアントのメーラーの設定でSMTP認証を使う必要がある。(postfixadminで作成したuser@domain.tldと設定したパスワード)
また、smtpサーバ(メール送信サーバ)のポートを587に指定する必要がある。
ここまでで、とりあえずのメールサーバ運用はできる。
ウィルスとスパムメール対策
つづいてウィルスチェックとスパムチェックを導入する。
スパムチェックとしてSpamAssassinを導入するが、メール配送(local_transport や virtual_transport)をprocmailで行わないとスパムチェックが有効にならない。
このため、procmailを導入する。
バーチャルドメインでのメールアカウントが主に使用するものなので、virtual_transport のみprocmailにまかせ、あまり使わない local_transport はlocalで行う(SpamAssassinは無効)。
ウィルス対策
アンチウィルスソフト導入(Clam AntiVirus) – CentOSで自宅サーバー構築を参考にClam AntiVirusをインストールする。
ウィルススキャンテストまで行い、ウィルススキャン定期自動実行設定は行わない(ウィルススキャン実行スクリプトも作成しない)
下記スパムメール対策のリンク先にあるが、Clam AntiVirusとPostfixが連携するように設定が必要。
ウィルス対策2・スパムメール対策
メールサーバーでウィルス&スパムチェック(Postfix+Clam AntiVirus+SpamAssassin) – CentOSで自宅サーバー構築を参考にClam AntiVirusとPostfixの連携、及び、SpamAssassinの設定を行う。
SpamAssassinのみを導入する場合
SpamAssassinのみを導入する場合はこちらも参考になる。スパムメールの学習なども紹介されている。
SpamAssassinでスパム対策 - Linux で自宅サーバ [ Home Server Technical. ]
procmailの設定
/etc/procmailrcを新規作成する。
バーチャルドメインでのメールアカウント保存ディレクトリは
/mail/domain.tld/user@domain.tld
# vi /etc/procmailrc

SHELL=/bin/bash
PATH=/usr/bin:/bin
DEFAULT=/mail/$DOMAIN/$USER\@$DOMAIN/
LOCKFILE=/mail/procmail.lock
LOGFILE=/mail/procmail.log   # ログ出力先
#VERBOSE=ON   # 詳細ログ出力

# SpamAssassinによるスパムチェック
:0fw
|/usr/bin/spamc
ログの肥大化を防ぐため、ログローテーション設定ファイル新規作成する。
# vi /etc/logrotate.d/procmail

/mail/procmail.log {
    missingok
    nocreate
    notifempty
}
Postfixとprocmailを連携させる
main.cfの設定
コメントを頂いた通り、以前の記事の設定だと同ドメインの違うユーザー名宛のメール(To:user1@hoge.comとcc:user2@hoge.com等)が1通しか配送されません。
procmail_destination_recipient_limit = 1 を設定すると解消されるようです。
該当箇所のみ更新
# vi /etc/postfix/main.cf

# virtual_transport = virtual  ←コメントアウト
virtual_transport = procmail  ←追記
procmail_destination_recipient_limit = 1 ←追記(2012/2/18追記分)

content_filter=smtp-amavis:[127.0.0.1]:10024 ←最終行に追記
master.cfの設定
# vi /etc/postfix/master.cf

最終行に追記
procmail unix - n n - - pipe
  flags=R user=vuser argv=/usr/bin/procmail -t -m USER=${user} DOMAIN=${nexthop} /etc/procmailrc
Postfixを再起動して設定を有効化
/etc/rc.d/init.d/postfix restart
テストする
メールを配信してみてヘッダ情報を見る。
spamasassinが有効なら
X-Spam-Checker-Version: SpamAssassin 3.2.5 (2008-06-10) on xxx.xxxx.jp
X-Spam-Level:
X-Spam-Status: No, score=-0.1 required=13.0 tests=AWL,CONTENT_TYPE_PRESENT, ISO2022JP_BODY,ISO2022JP_CHARSET,X_MAILER_PRESENT autolearn=ham version=3.2.5
Clam AntiVirusが有効なら
X-Virus-Scanned: amavisd-new at xxxx.jp
がヘッダ情報に挿入されているはず。
自動メールボックス作成
PostfixAdminを使ってバーチャルドメインでメールサーバを運営する場合、procmailを使うと自動でメールボックスが作成されなくなってしまう。
以前書いたpostfixadmin +procmailな環境でメールディレクトリの作成・削除でメールディレクトリの作成、及び、削除を自動化するスクリプトを作成する。
PostfixのTLS対応
-
前の記事

Crypt::RC4 で暗号化した時に改行コードが混じる場合がある点に注意 2011.01.06
-
次の記事
CentOS5.5 ImageMagick インストール関連 2011.01.07